Java J2ee Tutorials

Login Form Example With Struts

Wednesday, March 28, 2012

Login Form Example With Struts

This post will show you how a form process in struts 1 framework. We will create a login form and then using struts 1 we will verify the authentication of the user. This example will take following steps :

  1. First of all we will create a form bean (LoginForm.java) that will hold the form values provided by the user.
  2. Create a jsp page (Login.jsp) which will contain the form to be displayed to the user.
  3. Create a success page (Success.jsp) and failure page (Failure.jsp) for providing feedback to the user on their form submission.
  4. Create a controller helper class (LoginAction.java) that will check for the user input and decide which view to be respond to the users (Success.jsp or Failure.jsp).
  5. And finally we will configure our form bean and action classes in struts-config.xml.
LoginForm.java

Following is the code in LoginForm.java file:

package com.demo.form;

import javax.servlet.http.HttpServletRequest;

import org.apache.struts.action.ActionForm;
import org.apache.struts.action.ActionMapping;

public class LoginForm extends ActionForm {

private static final long serialVersionUID = -3491637470205228033L;

private String userName = null;
private String passWord = null;

public String getUsername() {
return username;
}

public void setUsername(String userName {
this.userName = userName;
}

public String getPassword() {
return passWord;
}

public void setPassword(String passWord) {
this.passWord = passWord;
}

@Override
public void reset(ActionMapping mapping, HttpServletRequest request) {
this.passWord = null;
}
}


There are two fields in this form bean “username” and “password”, that will hold the value of two fields in the login form. One new goods here is the method “reset” which is overwritten by our form bean. “reset” method is called at the end of the every request processed by the struts. In reset method we have set the value of password as null which means every time the user will open the login jsp in browser it will show the last username but will not show the value of password.

Login.jsp

Bellow are the content of Login.jsp:


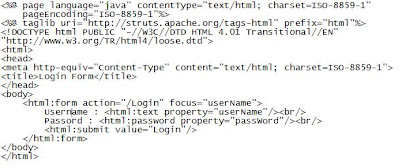
This jsp will render a form with two fields, “userName” and “passWord”. Struts HTML taglib has been used to create the form. will render as a html form with submit url as “/Login.do”, so our action must use this path in configuration to be run. will be render as html input tag and it’s value will be put in the “username” field of the form bean LoginForm. Same with the property “password”.

LoginAction.java

Lets look inside the code in LoginAction.java:

public class LoginAction extends Action {
@Override
public ActionForward execute(ActionMapping mapping, ActionForm form,
HttpServletRequest request, HttpServletResponse response)
throws Exception {
LoginForm loginForm = (LoginForm)form;
if(loginForm.getUsername() == null || loginForm.getPassword() == null ||
!loginForm.getUsername().equalsIgnoreCase("abc") || !loginForm.getPassword().equals("123")){
return mapping.findForward("failure");
}
else
return mapping.findForward("success");
}
}

As you can see first of all the ActionForm instance is typecast to LoginForm in the execute method of LoginAction and then logic to verify the username and password will decide which view to be send back to the user. In this case, username must be “rahul” ans password must be “abc” to go to the view associated with the “success”, otherwise view associated with “failure” will be returned. We can see the jsp files associated with “success” and “failure”.

struts-config.xml

Entries of form beans and actions aer done in struts-config.xml as follows :


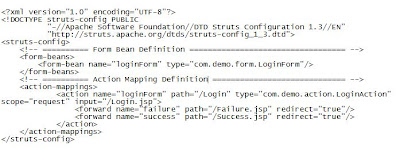
Our LoginForm class has been added as a form bean named “loginForm” and associated with the action class LoginAction. Attributes associated with the action class are specified as with the following reason :

name=”loginForm” : Struts will instantiate the LoginForm class will set the value of form properties.
path=”/Login” : The action class will be associated with the request path “/Login.do”. Hence the Login.jsp contains “/Login” as action attribute value.
input=”/Login.jsp” : Form inputs will be taken from Login.jsp.
There are two action forwards also registered with our action which tells struts that if “failure” is return by action then the response view will be “/Failure.jsp” and if “success” is returned by action then the response view will be “/Success.jsp”.

Deploy the war file in Tomcat 6 and hit the url in your browser you will get the following login form:

Free Career Predictions

Struts 1 Taglib

Saturday, March 24, 2012

The Struts Taglib component provides a set of JSP custom tag libraries that help developers create interactive form-based applications. There are tags to help with everything from displaying error messages to dealing with nested ActionForm beans.

Struts Taglib is composed of four distinct tag libraries: Bean, HTML, Logic, and Nested.

  • Bean: The bean tags are useful in defining new beans (in any scope) from a variety of possible sources, as well as a tag to render a particular bean (or bean property) to the output response.
  • HTML: The HTML tags are used to create input forms, as well as other tags generally useful in the creation of HTML-based user interfaces. The output is HTML 4.01 compliant or XHTML 1.0 when in XHTML mode.
  • Logic: The Logic tags that are useful in managing conditional generation of output text, looping over object collections for repetitive generation of output text, and application flow management
  • Nested: The Nested tags extend the base Struts tags to allow them to relate to each other in a nested nature. The fundamental logic of the original tags doesn't change, except in that all references to beans and bean properties will be managed in a nested context.

Free Career Predictions

Struts: Structuring a Web Application

Web application as a program that resides on a Web server and produces dynamically or static created pages in a hypertext markup language (most commonly HTML) in response to a user’s request. A user make request by clicking the link or button on the web page. To built the Web application, Java 2 Enterprise Edition (J2EE) must be used.

Web Container :

A web container is a program that manages the components of a Web application, in particular JSP pages and Java Servlets. A Web container provides a number of services, such as
  • Life-Cycle management: Web container provide the process of starting up and shutting down a component.
  • Concurrency: Provide the capability to process more than one action at a time.
  • Security : Provide the restricted access to components, such as username & password protection.
  • Portability: Access anywhere, taking very less resource.
  • Apache Tomcat & GlassFish Server are the example of a Web container, — an open-source implementation of the J2EE Java Servlet and JavaServer Pages (JSP) specifications. A specification is a document that describes all the details of a technology. Typically, a Web container also functions as a Web server, providing basic HTTP (Hypertext Transfer Protocol) support for users who want to access information on the site.

Structuring a Web Application

Free Career Predictions

Struts Example

Friday, March 23, 2012

Struts is modeled after the MVC design pattern, you can follow a standard development process for all of your Struts Web applications.

Identificaty of the application Views, the Controller objects that will service those Views, and the Model components being operated on.

1. Define and create all of the Views, in relation to their purpose, that will represent the user interface of our application. Add all ActionForms used by the created Views to the struts-config.xml file.
2. Create the components of the application’s Controller.
3. Define the relationships that exist between the Views and the Controllers (struts-config.xml).
4. Make the appropriate modifications to the web.xml file, describe the Struts components to the Web application.

Lets Start with step one. we will create the view file named index.jsp

index.jsp
<%@ page language="java" %>
<%@ taglib uri="/WEB-INF/struts-html.tld" prefix="html" %>
Sample Struts Application
Name:

We have used some Struts-specific Form tag like instead of HTML tags.

In the Form tags the attributes you can find some attributes defined in we will go through it.

action : Represents the URL to which this form will be submitted. This attribute is also used to find the appropriate ActionMapping in the Struts configuration file, which we will describe later in this section. The value used in our example is Name, which will map to an ActionMapping with a path attribute equal to Name.

name :Identifies the key that the ActionForm will be referenced by. We use the value NameForm. An ActionForm is an object that is used by Struts to represent the form data as a JavaBean. It main purpose is to pass form data between View and Controller components. We will discuss NameForm later in this section.
type :Names the fully qualified class name of the form bean to use in this request. For this example, we use thevalue example.NameForm, which is an ActionForm object containing data members matching the inputs of this form.

To use the HTML tags, you must first add a taglib entry in the application’s web.xml file that references the URI /WEB-INF/struts-html.tld. This TLD describes all of the tags in the HTML tag library. The following snippet shows the element that must be added to the web.xml file:

/WEB-INF/struts-html.tld

The struts-html.tld is placed in the /WEB_INF directory.

Next Step is to create the action form

The ActionForm used in this example contains a single data member that maps directly to the nameinput parameter of the form defined in the index.jsp View. When an is submitted, the Struts framework populates the matching data members of the ActionForm with the values entered into the tags. The Struts framework does this by using JavaBean reflection. The accessors of the ActionForm must follow the JavaBean standard naming convention for example

private String name;
public void setName(String name);
public String getName();

The NameForm.java file is shown below
NameForm.java

package example;
//import statements
import javax.servlet.http.HttpServletRequest;
import org.apache.struts.action.ActionForm;
import org.apache.struts.action.ActionMapping;

public class NameForm extends ActionForm {
private String name = null;
public String getName() {
return (name);
}
public void setName(String name) {
this.name = name;
}
public void reset(ActionMapping mapping, HttpServletRequest request) {
this.name = null;
}
}

To deploy the NameForm to our Struts application, you need to compile this class, move it to the /WEB-INF/classes/example directory, and add the following line to the section of the /WEB-INF/struts-config.xml file:


This makes the Struts application aware of the NameForm and how it should be referenced.

Now we create the out page for the sample application.
Lets name it diplayname.jsp
displayname.jsp


Sample Struts Display Name

Hello <%= request.getAttribute("NAME") %> !!


Now we move to the step two of creating the application's controller

In a Struts application, two components make up the Controller. These two components are theorg.apache.struts.action.ActionServlet and the org.apache. struts.action.Action classes. In most Struts applications, there is one org. apache.struts.action.ActionServlet implementation and can have many org.apache. struts.action.Action implementations.

The org.apache.struts.action.ActionServlet is the Controller component that handles client requests and determines which org.apache.struts.action.Action will process the received request. When assembling simple applications, such as the one we are building, the default ActionServlet will satisfy your application needs, and therefore, you do not need to create a specializedorg.apache.struts.action.ActionServlet implementation.

The second component of a Struts Controller is the org.apache.struts. action.Action class. As opposed to the ActionServlet, the Action class must be extended for each specialized function in your application. This class is where your application’s specific logic begins.
NameAction.java

package example;

import java.io.IOException;
import javax.servlet.ServletException;
import javax.servlet.http.HttpServletRequest;
import javax.servlet.http.HttpServletResponse;
import org.apache.struts.action.Action;
import org.apache.struts.action.ActionForm;
import org.apache.struts.action.ActionForward;
import org.apache.struts.action.ActionMapping;

public class NameAction extends Action {
public ActionForward execute(ActionMapping mapping, ActionForm form,
HttpServletRequest request, HttpServletResponse response)
throws IOException, ServletException {
String target = new String("success");
if ( form != null ) {
// Use the NameForm to get the request parameters
NameForm nameForm = (NameForm)form;
String name = nameForm.getName();
}
// if no mane supplied Set the target to failure
if ( name == null ) {
target = new String("failure");
}
else {
request.setAttribute("NAME", name);
}
return (mapping.findForward(target));
}
}


Moving to step three, to deploy the NameAction to our Struts application, we need to compile the NameAction class and move the class file to /WEB-INF/classes/example directory, and add the following entry to the section of the /WEB-INF/struts-config.xml file:


For step four we modify the web.xml file. We have to to tell the Web application about our ActionServlet. This is accomplished by adding the following servlet definition to the /WEB-INF/web.xml file:

action
org.apache.struts.action.ActionServlet
config
/WEB-INF/struts-config.xml
1

Once we have told the container about the ActionServlet, we need to tell it when the action should be executed. To do this, we have to add a element to the /WEB-INF/ web.xml file:

action
*.do

You will notice in the previously listed index.jsp that our action does not include a .do at the end of the URL. We do not have to append the .do because it is automatically appended if we use the tag. If you do not use the tag, then you will need to append .do to the action's URL. This mapping tells the Web application that whenever a request is received with .do appended to the URL, the servlet named action should service the request.

Free Career Predictions

Hibernate persist() vs. save()

Hibernate persist() vs. save()

For persist():
The semantics of this method are defined by JSR-220.
persist() is well defined. It makes a transient instance persistent. However, it doesn’t guarantee that the identifier value will be assigned to the persistent instance immediately, the assignment might happen at flush time. The spec doesn’t say that, which is the problem I have with persist().
persist() also guarantees that it will not execute an INSERT statement if it is called outside of transaction boundaries. This is useful in long-running conversations with an extended Session/persistence context.

save():
For save() it says, it is the hibernate standard.
first assigning a generated identifier.
save() does not guarantee the same, it returns an identifier, and if an INSERT has to be executed to get the identifier (e.g. “identity” generator, not “sequence”), this INSERT happens immediately, no matter if you are inside or outside of a transaction. This is not good in a long-running conversation with an extended Session/persistence context.

Free Career Predictions

DTO, VO, POJO

POJO: A Plain Old Java Object or POJO is a term initially introduced to designate a simple lightweight Java object, not implementing any javax.ejb interface. POJO is an acronym for Plain Old Java Object. The name is used to emphasize that the object in question is an ordinary Java Object, not a special object, and in particular not an Enterprise JavaBean.

Value Object (VO): A Value Object or VO is an object such as java.lang.Integer that hold values (hence value objects).

Data Transfer Object (DTO): Data transfer object (DTO), formerly known as value objects or VO, is a design pattern used to transfer data between software application subsystems. DTOs are often used in conjunction with data access objects to retrieve data from a database.

The difference between data transfer objects and business objects or data access objects is that a DTO does not have any behaviour except for storage and retrieval of its own data (accessors and mutators).

DTO vs VO
  • DTO - Data transfer objects are just data containers which is used to transport data between layers and tiers .It mainly contains of attributes ,You can even use public attributes without getters and setters .Data transfer objects do not contain any bussiness logic.
  • Analogy: Simple Registration form where you have attributes usename,password and email id . when you sumbit this form . In your servlet RegistrationServlet.java file you will get all the attributes from view layer to business layer where you pass the attributes to java beans and then to the DAO or the persistence layer . DTO’s helps in transporting the attributes from view layer to bussiness layer and finally to the persistence layer .
  • DTO was mainly used to get data transportd across the network efficiently , it may be even from JVM to another JVM .
DTOs are often java.io.Serializable – inorder to transfer data across JVM
VO - A Value Object [1,2] represents itself a fix set of data and is similar to a Java enum. A Value Object’s identity is based on their state rather than on their object identity and is immutable. A real world example would be Color.RED, Color.BLUE, SEX.FEMALE etc.

POJO V/S JavaBeans
  • The Java-Beanness of a POJO is that it’s public attributes are all accessed via getters and setters that conform to the JavaBeans conventions. e.g. private String foo; public String getFoo(){…} public void setFoo(String foo){…};
  • JavaBeans must implement Serializable and have a no-argument constructor. where as in POJO doesnot have these restrictions .

Free Career Predictions

Simple ArrayList Example | ArrayList Sample

Wednesday, March 21, 2012

  • package arraylistexample;

  • import java.util.ArrayList;
  • /**
  • * SimpleArrayListExample This is example for simple arraylist. It shows how
  • * to create an array list and also add the value into arraylist as well as
  • * reterive it
  • */
  • public class SimpleArrayListExample {
  • public static void main(String[] args) {
  • //creating arraylist
  • ArrayList al = new ArrayList();
  • //adding values into arraylist
  • al.add(1);
  • al.add(2);
  • al.add(3);
  • //Fetching the values from arraylist.
  • for(int i=0;i
  • System.out.println(al.get(i));
  • }
  • }
  • }
  • Free Career Predictions

    Session Tracking Example JSP

    Thursday, March 1, 2012


    Session Tracking Example


    Session tracking is maintain the state of a user through out the application.
    There are four typical solutions to this problem.
    1. Session
    2. cookie
    3. Url-rewriting
    4. Hidden field
    ==================

    1.Create a user login page "login-form.jsp"

    login-form.jsp

    User Login

    Login Name
    Password
    ===============

    2.create a page to check the valid user.if it exists then it stores in the session forward to the "welcome-home.jsp" else it come back again "login-form.jsp".

    login-form-action.jsp

    <%@ page language="java" import="java.sql.*;"%>
    <%
    String userName = request.getParameter("userName");
    String password = request.getParameter("password");
    System.out.println("MySQL Connect Example.");
    Connection con = null;
    System.out.println("MySQL Connect Example.");
    Connection conn = null;
    String url = "jdbc:mysql://localhost:3306/cms";;
    String driver = "com.mysql.jdbc.Driver";
    String username = "root";
    String userPassword = "";
    try {
    Class.forName(driver).newInstance();
    conn = DriverManager.getConnection(url,username,userPassword);
    Statement st = conn.createStatement();
    String strQuery = "SELECT count(*) FROM user WHERE loginId='"+userName+"' AND empPassword='"+password+"'";
    out.println(strQuery);

    ResultSet rs = st.executeQuery(strQuery);

    if(rs.next())
    {
    if(rs.getInt(1)>0)
    {
    session.setAttribute("userid",userName);
    response.sendRedirect("welcome-home.jsp");
    }
    else
    {
    response.sendRedirect("login-form.jsp");
    }

    }
    System.out.println("Connected to the database");
    conn.close();
    System.out.println("Disconnected from database");
    }
    catch (Exception e) {
    e.printStackTrace();
    }

    %>

    ===================
    welcome-home.jsp

    Free Career Predictions